Manually Trigger with Zapier Tables
Here’s how to manually trigger a Zap using Zapier Tables.
Zapier pulled out their secret weapon with Zapier Tables to go head-to-head
with Airtable for your data.
Until Zapier builds Tables out further (it’s still in beta), it’s not going to
fully replace your Airtable base.
But there are still ways to use Tables to save time.
Ever wanted to trigger a Zap manually?
Today I’m going to teach you how to use Tables to do just that.
When to Manually Trigger a Zap
Let’s start with some examples of when you’d want to manually trigger a Zap.
Giving Free Access. If you have Zaps set up that enroll a student in a
course, add a member to a community, or reveal content to a customer all based
on a purchase, you may want a way to manually trigger the Zaps for giving
access for free to a team member, friend, or family.
Tracking Lead Activity. Let’s say you have a Zap set up to take Calendly
bookings and add details from the call into the CRM for a lead you meet with.
Maybe you meet in person (rare in 2023!) and still need to track the activity.
You’d want to manually trigger the Zap.
Always have a Human Trigger. Sometimes you need everything automated
except for the trigger. For instance, you may have new hires’ information
added to a table. Then, when you’re ready to onboard them, you want to
manually run the Zap.
At Write of Passage, we would use Zapier Tables to manually trigger a Zap to
enroll students or teammates for free in the course. It saved us some time
trying to hack together a webhook trigger or some other way to kick off the
process.
Setting Up the Zapier Table
If you haven’t started using Zapier Tables, log in to your Zapier account, go
to the Tables landing page, and click “try for
free.”
- Create a new Table
- Add one field for each piece of data you want to capture and use in your Zap
- If you already have a Zap created that you’ll want to manually trigger, simply duplicate the Zap and change the trigger to “New Record in Table.”
- If you are creating a brand new Zap, click create Zap from within the Table.
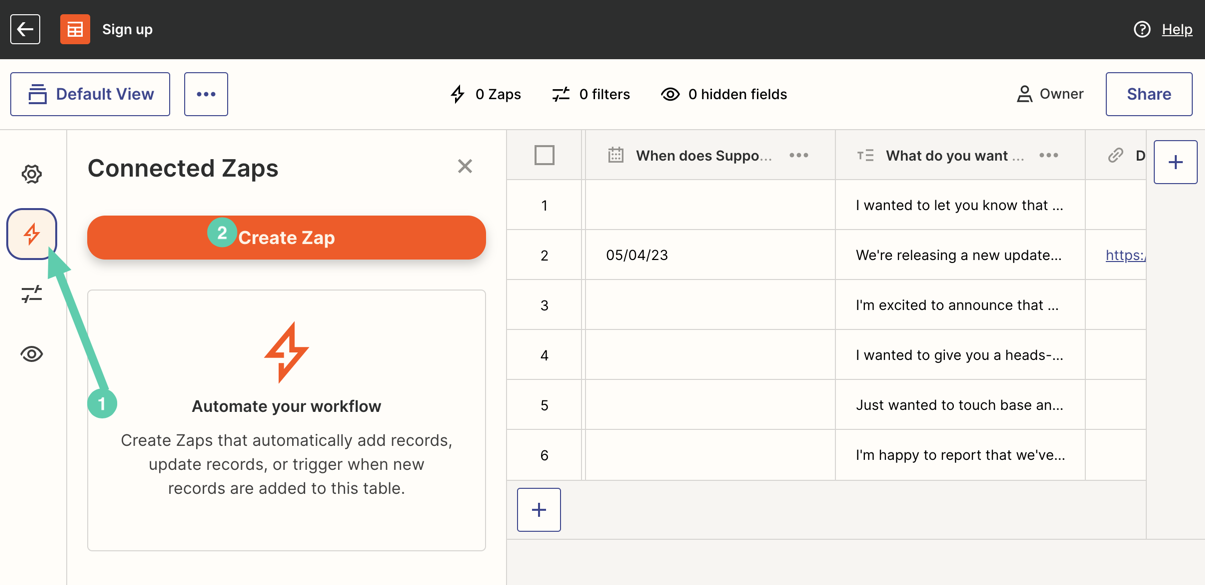
Lastly, add data into each row and then you’ll be able to manually select and
run the row through your Zap.
Time-Saving Tip
Anytime you create a Zap, it’s worth asking, “do I foresee ever needing to
trigger this Zap manually?” If you do, then you would want to create a SubZap
to hold the actions for the Zap. Then, you’d create two Zaps that would serve
as the triggers for the SubZap.
“Hold up. This is getting complicated.”
If you’re saying this, then go no further. We’re entering the next-level,
nerd-efficiency zone. But if you resonate, come with me for the next
paragraph.
So, you’d have three Zaps total:
- Main Zap — holds all the enrolling, adding, etc. actions for the Zap. Triggered by “Start a SubZap” trigger.
- Automatic Triggering Zap — a simple two-step Zap that triggers from whatever app would normally trigger your Zap. Then, the action would be “Call a SubZap” where you’d be triggering the main Zap.
- Manual Triggering Zap from Table — an almost identical Zap to number two except the trigger would be a new row from the Table you created.
This Zap system is made of three Zaps. It’s my solution for having two
different triggers for the same set of actions. You could technically create
as many triggers as you want with this system.
You’ll be able to adjust the Main Zap as much as you’d like while allowing for
both an automatic and manual trigger.
Okay, exiting nerd-zone.
To recap:
- Until Zapier Tables is more robust, it won’t replace Airtable.
- Use Zapier Tables to manually trigger Zaps to add flexibility to your automations
That’s it for this week!
Happy Building,
Bryce
Let's Connect

Learn to build with Zapier
Subscribe to the Build Anything Newsletter.
